Rainy days and Sundays always get me down when I can not garden!

Thursday, November 22, 2018

TAKE A GARDEN QUIZ


I've always thought of myself as being passionate about gardening and based on the results of the online quiz, “Whats your garden style?” (www.quibblo.com/.../What-is-your-garden-stylem), I am! According to this quiz, gardening (for me) is an all encompassing way of life, continuously on my mind, working towards self sufficiency. From heat to weeds, I enjoy it all. It allows me to connect with nature, and to “just be” in my happy place.


Have you ever given thought to how you would describe the look of your gardens? When it comes to my own I would describe them as a bit willy nilly. So, I took the quiz, “What's your garden personality” by Canadian living (www.canadianliving.com/home-and-garden/article/quiz-what). The results? The garden style that best fits my personality is an English cottage garden. This style of gardening is not for those who play by the rules. Anything goes and you will try at least once, twice maybe three times (insanity or determination?) something new. The English cottage garden is informal with a blend of ornamental, annuals and edibles such as herbs, fruit trees and vegetables.

Are you familiar with the name Capability Brown? If so, you may be able to call yourself a “pro gardener”. When you are not toying in your garden then most likely you are at the local garden center where as in the show “CHEERS” everybody knows your name. You may not think that you are an expert but take this quiz from stuff.co.nz (www.stuff.co.nz/.../Whats-your-gardening-personality ) and find out if you garden like a pro! And Capability Brown, he was a landscape architect from 18th century and considered England’s greatest gardener.

If you would say that your method of weed control is to pull them out, the sunflower is your first choice when it comes to annuals and you know what the word “bolting” means then you are truly a “green fingered gardening god” (www.playbuzz.com/.../whats-your-gardening-personality). You may own a half dozen pairs of gardening gloves but you have no trouble digging into the dirt with your bare hands!

If you do wear gloves then you may be interested in this quiz by The Garden Glove (www.thegardenglove.com/quiz-what-is-your-garden-style/ ). Take this five question quiz to learn what garden style is right for you and tips on how to create it.

If you answered with mostly A's, then you enjoy a “Nature Lovers Garden”. You love mother nature and take your cues from her. Your garden is not traditional and a bit wild. The emphasis may be on native plants but there is still a lot of creativity.

A Modern Garden (mostly B's) focuses on “less is more” and keeping things simple. The use of repetition in plant choices, color and plant placement puts the focus on hardscaping, form and texture.

I answered with mostly C's which resulted in the “Country Garden” Not as wild as a nature lovers garden the country garden is informal and tend to be a mix of many different types of plants but with a feeling of uniformity. The country gardener is always learning, not afraid to experiment nor are they afraid to change things up as needed.
French formal gardens are best viewed from a distance and usually includes straight lines of precision cut hedges, square beds, a water feature, statues and brick or stone pathways to give it a sense of order. If this is more your garden style then you answered with mostly D's.

Believe it or not, Sears has a quiz: What's your garden design style? (www.searshomeservices.com/blog/quiz-whats-your) Regardless if you are new to gardening or have been at it for a long time, this quiz will reveal if English Cottage, Asian-Inspired, Modern or Eco- Friendly expresses your inner gardener.

I was unaware that there are different types of gardeners so I took the quiz “What type of gardener are you? (www.proprofs.com/quiz-school/story.php?title=NjI) The results “Vegetational Deity”. (Vegetational of or pertaining to vegetation and deity, god or goddess). My garden is my domain and a representation of who I am. I will not hesitate to pull out plants that disappoint, move plants about the garden as needed and spend endless hours striving for perfection never to be satisfied. Based on this description it appears as if there is no end in sight!

For added fun (why not) I took the quiz “What's your mulch personality?” (www.bhg.com) Being a “true gardener” I prefer compost as my mulch of choice. What other kinds are there?

Lastly, the garden style quiz by Monrovia (www. monrovia.com) is designed to help you find which garden inspiration best fits your lifestyle. The results “Echo Friendly Garden” describes all Master Gardeners. It's principles are:

1. Go green by composting yard waste and kitchen scraps, reuse, re-purpose and recycle when ever possible, and water wisely.

2. “Do no harm” by going native, removing non- native, invasive species and avoiding the use of pesticides, herbicides, and chemical fertilizers.

3. You love this planet and give back by providing food, water and shelter for pollinators and work with mother nature to create a friendly wildlife habitat. You also give back by volunteering your time in the community.


Explore the wold of gardening with on line self assessment quizzes and see how your garden grows!


Monday, July 16, 2018

PROTECT and CERTIFY


In 2007, to address the declining pollinator populations the U.S. Senate approved one week in June as National Pollinator Week. This years National Pollinator Week designation is June 18-24 2018. In 2011 Penn State Master Gardeners took action to protect pollinators and started certifying gardens “Pollinator Friendly”. Currently there are 750 certified gardens in 56 counties in PA. The top three counties are Lancaster with 87, York with 76 and Berks with 63. Delaware county has sixteen certified gardens and is tied with Lebanon county for thirteenth place.

So what's involved in getting your garden certified pollinator friendly? To begin, download the application at https://ento.psu.edu/publications/pollin-app. Complete the contact information and the location of the garden that you are certifying. The application is then broken down into four parts.

STEP ONE:PROVIDE FOOD
Certification is based on the use of native plants do to their close relationship with pollinators. Plants selected need to provide pollen and nectar from early spring, through summer and into fall and offer different flower shapes and sizes. A combination of four trees and/or shrubs are needed (unless you are unable to meet this criteria) plus two different species of perennials from each season (planted in groups of three) for a total of eighteen plants. Two of the trees, shrubs or perennials must be a host plant for caterpillars (ex. Milkweed for the Monarch). The list of seventeen trees, twenty three shrubs and forty two perennials are suggestions, however, other natives will be considered.

STEP TWO: PROVIDE WATER SOURCES
Just like most living things pollinators need water. If you are not lucky enough to have a creek, stream or pond on your property, then a simple bird bath or mud puddling area will suffice. However, for certification this is a must.

STEP THREE: PROVIDE SHELTER
70% of our native bees nest underground. Others are solitary nesters using hollow stems, holes in wood, or crevices in stones. Many bees and insects overwinter as eggs, larva, chrysalis or adults under leaves, rocks or loose bark, at the base of grasses and inside stems. Providing bare areas in your lawn, rock piles or dead wood and man-made bee boxes will help to provide nesting sites and shelter. By keeping your garden clean up until late April will ensure that you will not disturb overwintering insects.

STEP FOUR: SAFEGAURDING POLLINATOR HABITAT
The certification is based on native plants do to their close association with pollinators. Native plants are four times more attractive to pollinators then non-native plants. Non-natives threaten the local ecosystem, disrupting biodiversity and pushing out natives. Avoid purchasing non-natives and work on removing them (especially invasive) from your garden and replacing with suitable natives. Reduce the use of pesticides or use sparingly according to the guidelines given.

Complete the application by answering the questions on the area, size and description of the garden site. For the purpose of verification you will need to include either a sketch or pictures showing the location of the required plants. Finally, sign the application and submit it (mail or e-mail) along with a $10 non-refundable processing fee.

Once your application is received it will be reviewed by the pollinator committee and if it meets all the criteria then your garden will be certified and registered. You will also receive a certificate recognizing that your garden is certified “Pollinator Friendly”. To “show off” to your neighbors or perhaps explain why your garden looks the way it does you can purchase a garden sign for $30.00.


Friday, May 11, 2018

TALKING TO HONEYBEES


Since the time of Aristaeus, the God of Beekeeping, it was believed that bees had the power over death. Bees represent birth, resurrection and immortality along with wisdom. Bees are the messenger between the living world and the spirit world. Customs dating back to medieval England talk about “the telling of the bees” of a birth, death or any other major event. Invitations to social occasions were made either verbally at the hives or written, tacked to the hives. Talking to the bees in advance was believed to keep the bees from dying, absconding (fly off) and to continue producing honey.

One of the earliest documented references on this is J Molle's The Living Libraries (1621), "Who would beleeve without superstition (if experience did not make it credible), that most commonly all the bees die in their hives, if the master or mistresse of the house chance to die, except the hives be presently removed into some other place? And yet I know this hath hapned to folke no way stained with superstition." The belief was that the attachment of bees to the beekeeper was so strong that if the beekeeper dies so does the hive thus the hive is moved to a new location.

On September 13, 1790 an article appears in the London newspaper the “Argus” on the custom of “turning the bees”. The belief is that the hive of the deceased is turned around as their corpse is being removed from the home. Another practice is the “heaving up” of the hives. Here, the hive of the deceased is picked up at the same time as their coffin is being removed from the home, based on a belief that the soul of the deceased returns as a bee.

In the book, The Secret Life of Bees by Sue Monk Kidd, Lilly, Zach and August drape black crepe fabric over the hives in response to May's death. August explains to Lilly that “covering the hives was supposed to keep the bees from leaving. You see, the last thing they wanted was their bees swarming off when a death took place. Having bees around was supposed to ensure that the dead person would live again.” August goes on to explain that with death there is rebirth.

Most people don’t have any idea about all the complicated life going on inside a hive. Bees have a secret life we don’t know anything about.” -The Secret life of Bees


Tuesday, April 10, 2018

RESIST THE FEVER TO SPRING CLEAN


Many beneficial insects overwinter under leaves, inside the hollows of plant stems, on branches and in the soil of your garden. Insects are an important part of your local ecosystem pollinating ¾ of all flowering plants and 1/3 of the foods we enjoy. Since 1989 there has been a 75% decline in the insect population. Good bugs eat bad bugs and all bugs provide food for fish, amphibians and birds. 98% of all songbirds need insects to feed their young. Ideally, garden clean up should not start until outside temperatures are around fifty degrees and the soil is dry (mid-April to mid May). Spring clean with care, gently removing leaves so not to disturb ground nesting bees, overwintering butterflies, and predatory (good) insects. Avoid bagging yard waste, instead, place it in a compost bin or in a pile off to the side for late emerging insects. Lastly, avoid mulching to soon making it hard for soil loving insects from emerging.

 “No winter last forever: no spring skips it's turn”. - Hal Borland


Monday, February 26, 2018

PRE-SEEDING FOR AN EARLY START IN THE GARDEN


One February I remember my father going out into the garden and planting seeds. We had had a good bit of snow the previous week and there were still reminders of it in the shadier parts of the backyard. However, the sun was out, the temperature had warmed and the snow had melted away in the garden. This February, just like my Dad, I'm planning to be out in the garden planting seeds, weather permitting. When I asked my dad what he was doing that day he replied, an “experiment”, but in actuality he was pre-seeding the garden.

Pre-seeding reminds me a little bit of “winter sowing” but with out the jugs. They both allow for an earlier start to the growing season, the plants are already conditioned to the outside so there is no need for “hardening off” and there is little or no chance of transfer shock which makes for healthier plants. Plants started indoors are grown under “controlled” conditions and even with proper transition to the outside will still go through a period of stress. This stress delays the plants growth, makes it vulnerable to insect and disease, and reduces productivity. In addition, not all vegetable seeds should be started indoors: if it grows under ground then direct sow with the possible exception of onions. Seeds of peas, beans and corn may be started indoors but are tricky to transplant outdoors and will most likely suffer for it.

Many annual seeds weather the winter because of sheer numbers. They produce an overly abundant amount of seeds so some are sure to survive. However, a cold spell is not required for annual seeds to germinate. The “relative cold tolerance” of annual seeds as it applies to seed germination can be broken down into hardy, half-hardy and tender(tropical) annuals. This should not be confused with plant cold hardiness and may not correspond. Hardy annual seeds can handle being frozen and can be planted in late fall or as soon as the ground can be worked in early spring. Half hardy annual seeds do not tolerate being frozen and should be sown after the ground has thawed but it's not necessary for the soil to warm up. Tender (tropical) annual seeds should be planted only after the soil has warmed and all danger of frost has passed.

The ideal time to pre-seed veggies seeds is when the temperature has dropped and there is little chance of freeze-thaw cycles. Germination begins when the soil temperature is within the minimum/maximum range and seeds absorb water and swell. Once germination begins it can not be stopped. Air temperature is critical for sprout survival. A warm spell sufficient to start germination that is then fallowed by a cold snap will kill seedlings. (During the winter soil temperature is warmer then the overlying air temperature). “Optimum soil temperature” is the temperature at which you will get maximum germination in the shortest amount of time. Percent of success on seed packets is based on optimum soil temperature. If conditions are not 100% ideal, sow seeds a bit heavier then suggested. You can always thin them out later.

Select the area you plan to pre-seed in the fall and make sure it's not an area prone to standing water come spring, which will rot your seeds. Prepare the garden area by removing spent plants, weeds and other debris. Add more soil if needed and work in compost. Cover with shredded leaves, straw or other mulch. When it's time to plant pull back on the mulch and sow according to the directions on the seed packet as it pertains to seed depth and spacing. Spread the mulch back over your newly planted areas.  Some of the more cold hardy veggies seeds are your root vegetables, lettuce, peas, celery, swiss chard, spinach, “cole crops” like broccoli, brussel sprouts, cabbage, cauliflower, collards, kale, mustard greens and kohlrabi. The area I'm planning to pre-seed is between my rows of already planted garlic. I allowed for extra spacing (twelve inches) and all except peas are good companion plants.


Sunday, January 28, 2018

WHEN DOES YOUR GARLIC GROW?


Along with tulips, daffodils and crocuses I have always planted garlic in the fall. However, at a recent Master Gardener meeting a question was raised as to when to plant garlic? I thought to myself, the fall of course! Imagine my surprise when several members replied “in early spring”. Baffled, I decided to do a little research.

The “center of origin” (or “center of diversity”) from which garlic originated is believed to be in the area of China, India, Egypt and the Ukraine. Garlic is one of the oldest cultivated foods although it is uncertain as to when it was first discovered or used. Records dating back to the 4th millennium BC (4000-3001bc) mention the use of garlic for health and medicinal uses. Garlic made it way to the US in the 1700's, however, it was not widely accepted due to its pungent smell and “garlic breath”. It wasn’t until about the 1920's that garlic became more accepted in the US and by the 1990's its consumption has more then tripled with the average person eating 2.3 pounds (170 cloves) of garlic yearly. Today, the US is the fourth largest producer of garlic and the worlds largest importer!

Garlic is available in a variety of sizes, shapes, color, taste or pungency, cloves per head and shelf life. World wide there are at least 600 cultivated sub varieties and ten genetically distinct groups. True garlic (Allium sativum) is a member of the Liliacea (lily) family, along with chives, onions, leeks, and shallots. There are two sub species of Allium sativum, ophioscorodon or hardneck (aka stiffneck) garlic and sativum or softneck garlic. To complicate things just a bit more, softneck garlic has been cultivated from hardneck garlic over many, many, many years. Additionally, elephant garlic is not considered a true garlic, but instead is a variant of a leek.

Garlic reproduces by bulb division (asexual reproduction), bulbils (miniature cloves) harvested from mature scapes (hardnecks) and sexual reproduction by seed (hardnecks). Most garlic is asexually propagated by means of vegetative reproduction. Asexual reproduction is when a new plant is produced from a single parent with out fertilization or meiosis (cell division). Its a sterile clone of the parent with the same identical genetic make up. In vegetative reproduction, just one example of asexual propagation a new plant grows from a piece of the original plant. In the case of garlic, a clove.

There are four factors at play that influences the reproductive process in order for garlic to form bulbs, day length, soil and air temperature and vernalization or prolong period of cold. Garlic is day length sensitive with short day hours (long nights) contributing to more vegetative or top growth and long days (short nights) triggering bulb formation and the elongation of the flower stalk (scape) in hardnecks. Longer days also means warmer soil and air temperatures. A majority of garlic varieties have evolved and/or thrive in cooler climates. This is the reason why a chilling period of six to twelve weeks is needed in order to produce a bulb, especially when it comes to hardneck varieties. So, after a long vernalization period, fallowed by warming soil (60+) and air (68+) temperatures plus thirteen hours of daylight, bulb formation begins. (The challenge of growing large garlic bulbs in the south is to have plants with lots of leaves and good root system before bulbing begins.)

Another way to look at softneck vs hardneck is spring planting vs fall planting. As mentioned above hardneck variety’s need a cooling off period and is best planted in the fall. They also handle harsher weather conditions. Softnecks do well under a variety of weather conditions but are more ideal for the south or planted in early spring in the north. With that being said can you grow hardnecks in the south and softnecks in the fall?

By the time the autumn equinox arrives I have ordered/received my garlic and prepared my beds for planting. In the northern part of the county, Columbus day is the unofficial start of the garlic planting season with Halloween the unofficial end. However, over the pass few years I've have planted garlic well into November. The trick for fall planting is to get the cloves in the ground in enough time for good root growth (three to six weeks) but not to early that you get more then four inches of top growth. This is ideally two to three weeks after the first frost but about a month or so before the ground freezes. The soil temperature at four inches deep should be around fifty degrees Fahrenheit. (Raised beds are about eight to thirteen degrees warmer then planting in the ground). Any top growth will die back in the winter and then resume in the spring.

Garlic tolerates a variety of conditions but will do its best in loamy, nitrogen rich, weed free soil with good drainage, a pH between 6.0-7.5 and six plus hours of sun for good bulb development. If planting in the fall you will need to mulch unless you are guaranteed consistent snow coverage of six inches. When planting garlic I do not like to separate the cloves until I'm ready to place them in the ground. In my raised beds I plant each clove three to four inches deep and six inches apart in rows spaced one foot apart. In the spring I begin to pull back the mulch and feed with fish emulsion (or side dress with compost) when shoots appear. Garlic also likes a good bit of water, about one inch weekly. Rotate where you grow your garlic every three years.

Hardneck garlic produces a scape sometimes referred to as “serpent garlic” because of how it curls around. These scapes are edible and may be eaten raw or cooked. If left on, the energy is directed to the scape resulting in smaller garlic bulbs.

Fall planted garlic is ready for harvest in about nine months, typically June or July. The lower leaves of healthy plants begin to turn yellow and if the scapes are left on they will straighten out. The goal is for maximum size with out splitting. Carefully dig up your garlic and air dry away from sun to prevent scalding in a well ventilated location for two to three weeks. Once cured rub off any dirt and remove tops or braid. Garlic harvested early or used fresh is known as “green garlic”

Planting garlic in the spring gives you an opportunity for a second chance in case you missed the fall planting season. In the north, softneck varieties are better in spring since they do not require as much or any cold exposure. Plant as early as the ground can be worked, however, a delay in spring planting and/or less then ideal weather conditions may lead to week shoots and poor bulb development. If you wish to plant hardnecks in the spring you will need to store the bulbs at or below forty degrees (not in the freezer) for a minimum of forty days. If not the bulbs will not differentiate (divide). Even under the most ideal conditions you will still get better yields and larger bulbs with fall planted garlic.

A nickel will get you on the subway, but garlic will get you a seat” Yiddish proverb


Tuesday, December 12, 2017

FESTIVE "TOPIARY" CHRISTMAS TREES!

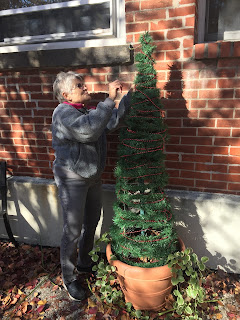
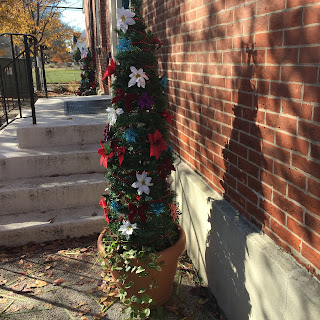
The Schoolhouse garden club created festive "topiary" Christmas trees utilizing tomato cages.  The upside down cages were anchored to the pots, wrapped with garland and decorated with seasonal adornments.


Senior Community Services
600 Swarthmore Avenue
Folsom, PA 19033
www.scs-delco.org
610-237-8100