Rainy days and Sundays always get me down when I can not garden!

Monday, January 28, 2013

Celery, Celery Soup and Growing Celery from Seeds and Stalks

What is tricky to grow, is a heavy feeder,  requires patience and a lot of water, needs temps between 50 and 70 degrees throughout its growing season, is considered a negative caloric  food, can provoke a severe allergy reaction (if allergic), high in vitamin K, and native to Greece?  Of course we are talking about celery!

I attempted to grow celery last year and was unsuccessful.  I hadn't done my research.  But after talking to a fellow gardener, who grows celery with great success, I was encouraged to try it again.    There is a lot of information out there on this topic.   I tried to simply it the best I could.

If you are starting celery from seed, start indoors 10-12 weeks before the last spring frost.  Celery is a slow grower, with a long maturation period (16 weeks).  Soak celery seeds in warm water (4+ hours), to speed up germination.  Place 2 or 3 seeds to a pot and cover lightly with starter soil.  Celery seeds needs light and constant moisture, and takes about 7 to 14 days to germinate.  Plan to transplant celery into the garden 1 to 2 weeks before the last frost date, when plants are about 4 to 6 inches tall.  Harden off  7 to 10 days (and there are 5 to 6 leaves on each plant), prior to transplanting.  Plant in rich, well composted soil with a pH of 5.8 to 6.8.  Keep soil moist throughout the growing season. If temperatures fall below 50 degrees for an extended period of time, celery may bolt (this is where a hoop house would help).  However, celery can handle a lite frost.  Plant celery where it gets about 6 hours of sun daily, but avoid the hottest part of your garden  (or provide a shade cloth).  Use fish emulsion or other organic liquid fertilizer to encourage vigorous growth.


Non-organic, commercially grown celery, ranks high on the list of vegetables contaminated with chemical pesticides.  It may be worth taking on this gardening challenge once more!


A (very) Simple Celery Soup Recipe


2 T olive oil
2 T of butter 
4 cloves of garlic sliced
1 medium onion chopped 
1 baking potatoes chopped
1-2 pounds of celery, cut into 1/2 inch pieces
sea salt (to taste)
pepper (to taste)
seasonings such as thyme or basil (to taste)
juice of 1 lemon
half-and-half or cream 1/4 to 1/2 cup


Heat olive oil in a heavy- bottom soup pot on medium heat.  Add onions, garlic,celery, salt, pepper and seasonings and cook for about 5-10 minutes, or until celery is soft.  Add 6 cups of water,  potato and butter. Bring to a boil.  Reduce heat and simmer for about 20 minutes.The celery and potatoes should be very tender.  Carefully, puree in batches in a blender. (Remove center from lid and cover with a folded dish towel, allowing steam to escape).  Return to pot and add lemon juice and additional seasonings as needed.  Add cream before serving.

Starting Celery from Stalks

I had heard that you could grow celery from the stalks, so I thought I would give it a try. 
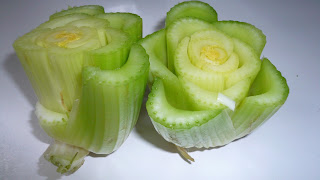
Cut celery about 1-2" from its base.

Place cut side up in water for about a week, changing water every couple of days.  Place near a sunny window.

After about a week, I planted them in large peat pots using potting soil.  The centers are starting to grow.   

2 weeks growth.  I used a little fish fertilizer on them today.

Check back for updates!

Tuesday, January 15, 2013

RED- TAIL HAWKS


Also referred to as a chicken hawk, this bird of pray is the most common hawk in North America (estimated one million) and protected by the Migratory Bird Treaty Act of 1918.

Carnivores, 85% of their diet consist of rodents, which they swoop down on and pin with their talons.  They are also able to catch birds in flight, and may hunt in pairs.

The first time we have seen two together.
Red-Tails are monogamous, mating for life, or until a mate dies.  The  females are 25% heavier then the males.

These birds are known to live in the wild for as long as 21+ years.  The oldest Red-Tail in captivity lived for 29 1/2  years.

The Red-Tail is a popular bird of choice in the sport of falconry.

Monday, January 14, 2013

SHAPE UP YOUR GARDEN, SHAPE YOURSELF UP FOR GARDENING

As we prepare to get our gardens in shape for the upcoming spring, we also need to get ourselves in shape for gardening!

Gardening and yard work involves cardio, flexibility and strength.  And though you are gardening to exercise, not exercising to garden, we spend 2.5 to 15 hours a week (depending on the time of year) on average, on this "exercise".  But, for those of us who "hibernate" in the winter, the springtime may be more then the start of the growing season.  It may be the start of sore muscles, backaches, strains, or worse!


Before the start of any exercise program, check with your Doctor.  Access your current fitness level and start slowly.  Remember, gardening and yard work involves bending, lifting, crouching, twisting, endurance, and sweating.  Drink plenty of water, and if possible avoid "exercising" during the hottest part of the day.   


Begin your exercise program with a warm up.   This can be as simple as walking for 5-10 minutes around your garden.  Follow with stretches or some yoga to increase flexibility and reduce the risk of injury.  Start off slowly and work up to the harder tasks at hand.  Intersperse aerobic activity with lifting for interval training and to maximize benefits.  Stop and stretch during your workout to relieve any areas that become stiff, tight, or sore.  Take the time at the end to cool down, again with a slow walk or with additional stretches.

Here are a few suggestions to get you exercise ready for gardening...

Standing Forward Stretch-Improves flexibility of hips, hamstring, calves, and the spine.  From a standing position, bend forward at the hips.  Cross your forearms and hold your elbows in the opposite hand, over your head, close to your legs.  The weight of your arms will help to enhance the stretch.  Hold for 30 seconds to a minute.  Slowly return to a standing position.

Lateral Side Stretch-Helps to realign the spinal column.  Begin standing, feet touching, knees slightly bent.  Place the right hand on hip, raising the left arm overhead, keeping it close to the head.  Tilt to the right, to feel the stretch on the left side.  Repeat on the opposite side.

Push-ups-One of the oldest and most effective, basics of exercises.  Often referred to as the "perfect exercise", push-ups strengthens the upper body and tones the core muscles. There are many variations on push-ups from  standard to modified, wall or counter push-ups, one armed or one legged,  incline or elevated, military and so on.  Regardless if you are a beginner, intermediate or advanced, pick the type of push-up that is best for you and always use proper form.

Plank-Strengthens arms, wrist, spine, glutes, and chest and tones the abs.  Also improves balance and increases endurance. Just like push-ups, there are several variations of  the plank.   Find a variation that works best for you and your abilities.

Wall Squats-Targets upper legs and glutes.  Stand with your back against a wall.   Your feet should be about 6 inches apart, toes facing forward, and 18 inches from the wall.  Slide yourself down the wall until your thighs are parallel to the floor.  Hold position.

Standing Calf Raises (with ankle rotation)-With feet shoulder width apart, slowly rise up on your toes, lifting heels off the floor.  Return to the starting position.  Do 3 sets of 10, provided you are without  pain or discomfort.  Finish with ankle t\rotations.  Lift one foot off the floor and using your big toe, draw a circle to the right and then to the left.  Repeat on the other foot.

Jumping Jacks-Simple and fun, and who doesn't know how to do them?  Jumping jacks provide aerobic and strength building benefits.

Physical exercise falls under four areas, flexibility, cardiovascular, muscular strength and endurance, and balance and coordination.  None of the above requires expensive equipment or a gym membership.  Try  to include something from each of these basic areas, blending a variety of activities that you enjoy, working at a level that is right for you.


So why the rest of the world is vowing to get in shape for the new year, we gardeners should vow to get in shape for the next growing season.

Monday, January 7, 2013

Attracting Birds with Homemade Bird Suet

"Everyone likes birds.  What wild creature is more accessible to our eyes and ears, as close to us and everyone in the world, as universal as a bird?"
David Attenborough
 
www.brainyquote.com/quotes/keywords/bird.htm


Save the drippings from your bacon and  other cooked meats.  You can also  purchase suet from  a butcher or buy lard  at your grocery store.  To keep from turning rancid, store in the refrigerator or freezer.

Soften your fat on low heat.  Avoid scorching since fat is flammable at high temperatures.

  Once melted, strain through cheesecloth to remove unwonted particles or  contaminants.

Commercial bird seed

The simplest combination is to mix equal parts seed with the fat.

Select a "mold".  (I picked these bundt pans up at a thrift shop. )  Coat with oil to help facilitate removal. 
You can add a variety of ingredients to your suet mixture.  I like to add crunchy peanut butter, flour, cornmeal, and  either crackers, nuts, dried or fresh fruit.  Experiment, but I have found that if in doubt, more fat is better then less.  

Once the pans are filled the suet needs to solidify.  Place in the refrigerator or freezer.    


A loaf pan is ideal for cutting into blocks and placing into suet feeders.
Hang in an area out of direct sunlight.  


Tuesday, January 1, 2013

Happy New Year!!!


My New Years resolution is to plan a bigger and better garden then the year before!!!!