Rainy days and Sundays always get me down when I can not garden!

Tuesday, December 12, 2017

FESTIVE "TOPIARY" CHRISTMAS TREES!

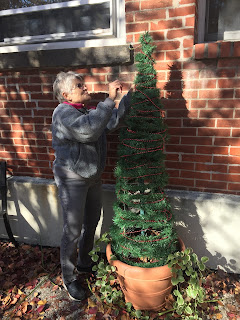
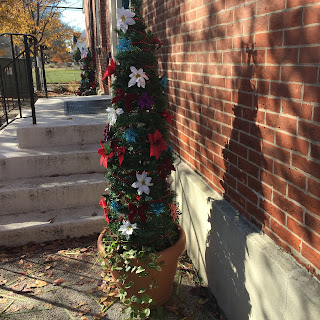
The Schoolhouse garden club created festive "topiary" Christmas trees utilizing tomato cages.  The upside down cages were anchored to the pots, wrapped with garland and decorated with seasonal adornments.


Senior Community Services
600 Swarthmore Avenue
Folsom, PA 19033
www.scs-delco.org
610-237-8100

Monday, November 20, 2017

RAISING MONARCHS

It all began on August 10th when I spotted a female monarch fluttering about my milkweed. I had started growing milkweed several years earlier when I first became aware of the decrease (90% over a span of two decades) in these beautiful Lepidoptera. As many of you may know, milkweed is the only host plant for monarchs. (Host plants provide a place for the female to lay her eggs and the food source for the caterpillars.) I figured by growing milkweed I was doing my part until I heard about “cat mammas”, individuals “collecting” and “raising” monarchs indoors. Monarch eggs are very small making it hard to spot them, however, watching a female lay her eggs you need only to wait and collect the leaf once she is finished! As I learned later, it may also ensure that the egg/caterpillars are not parasitized by the tachinid fly. So there I was collecting the leaves and bringing them inside the house, and even though I had already read up on the process, I was on a crash course in learning how to raise monarchs!


DAY 0-5 EGG  


The female monarch can lay between 100-500 eggs in her lifetime. She prefers younger plants or the newer leaves towards the top of older milkweed since they are easier for the cats to eat. She deposits one egg to the underside of the leaf securing it in place with a “glue” like substance. The egg is cream colored with distinct ridges, measuring 1.2mm high and .9mm wide. From the time the cat emerges from its egg it begins to eat, starting with its own shell!


DAY 3-17 LARVAL STAGE or “CATS”

Monarch cats are born to eat. They have a voracious appetite resulting in a 2000%+ increase in their size over a two week period. And with all this eating there is a lot of frass (poop)! During the larval stage the cat goes through five growth spurts or “instars”. (At the first instar the cat is between 2-6mm and by the fifth instar 25-45mm).  Each instar takes between one and three days to complete with the exception of the fifth which can take three to five days.  Temperature, humidity, light and quality of food effects this growth rate.  With each growth spurt stretch detectors signal that a newer, larger skin is needed. The period between each instar is when the cat molts or sheds. Shortly before molting your cat may not eat, remain still or wonder off. When its ready the caterpillar spins a bed of silk on which to anchor itself. This liquid silk is produced in the salivary gland which is excreted through a tube-like structure called a spinneret, located in the caterpillar's mouth. The head capsule is expelled first and then the cat wiggles/walks out of its old skin. Once out, the cat, you guessed it, eats the newly shedded skin!

By the fifth instar the caterpillar has grown to about two inches in length and has become rather plump. Once again, when ready, it will stop eating and wonder off. This time however, its looking for a safe place for its final transformation. This will typically be at the top of your enclosure.


DAY 15-19 “Hanging Out”

Once a cat finds a safe place to hang out it will weave a patch of silk for its final anchor. It will then turn around and grab on tight to this silk pad with its rear clasping hooks. The cats life may very well depend on this “death grip” since falling would most likely injure/kill the caterpillar. While hanging they look like a “j” and will remain this way for one to two days. The cessation of the “juvenile hormone” triggers the caterpillar to shed its exoskeleton and reveal the pupa or chrysalis. When this happens they wiggle, twist, jerk and squirm their way out, splitting the skin from the head to the rear and finally breaking the ligament that is holding the skin to the pupa. This time they do not eat the skin and you can usually find it at the bottom of the enclosure. The chrysalis starts out soft (and should not be handled) but will harden over time to form a protective shell. If you need to move a chrysalis for any reason its best to wait a few days.


Day 17-31 DON'T CALL ME A COCOON!

Anticipation, and like a nervous “cat momma” I wait, and wait and wait. It takes about two weeks for a monarch caterpillar to rearrange all its parts and “eclose” (emerge) as a beautiful butterfly. Shortly before the butterfly is about to make its debut the chrysalis becomes transparent and the pupa darkens, making it possible to see the outline of the wings. Once out of the shell, the butterfly hangs upside down so that fluid (hemolymph) can be pumped from the abdomen to their crumpled wings, forcing them to stretch out and expand. If either or both wings harden before fully inflated they will be unable to fly. This process takes between 30 minutes to several hours and the butterfly should not be handled (if possible) during this time. In addition to their wings, the tongue (proboscis) which is in two halves must fuse together to form a tube. The monarch will extend and retreat the two halves until it becomes one. Failure to do so will result in the monarchs inability to take in nectar.

The MAGNIFICENT MONARCH  

The average life of an adult monarch is 2-6 weeks during the summer. They mate within days of emerging and the female immediately begins to lay eggs. It is possible to have multiple (2,3,4) generations in a single summer. The exception are monarchs born in late summer which do not mate but travel (the great monarch migration) to their winter destinations of Southern California (western monarchs) and Mexico (eastern monarchs). Here they will over winter in a semi-dormant state until they begin the process all over again in the spring!

There is about a 10% survival rate from egg to butterfly in the outdoors. However, there's an upwards of 90% success rate with monarchs raised indoors. Here are a few things I learned along the way.

  1. Grow your own milkweed and have plenty of it. Cats need fresh leaves almost daily void of any pesticides. It also suggested to rinse the leaves with a water prior to feeding them to your cats.
  2. Have the correct raising cages designed to keep the cats safe, provide adequate ventilation, light, humidity and are easy to keep clean.
  3. Although its no guarantee, starting with eggs or very small cats (first and second instar) reduces the chance of the cat being parasitized by tachinid flies.
  4. Cats are very sensitive to a magnitude of ingredients and when they come into contact with them or are poisoned they throw up a green liquid. Keep your raising area chemical free and off limits to all potential hazards including pets.
  5. To avoid smaller cats from becoming lunch for larger cats (fourth and fifth instars) keep them in separate containers. Do not overcrowd your enclosures and keep butterfly’s separate from caterpillars. If you suspect that a cat is sick, separate it from the others.
  6. Clean cages daily of frass.
  7. Wash and rinse hands well before and after handling milkweed*
  8. Learn to recognize common monarch diseases and parasites. However if already sick, the chances of survival are slim.
  9. Be prepared to euthanize sick cats and/or butterflies if necessary.


Out of the eleven I started with from either eggs or very small cats, eight made it to adulthood (73%). I released my first butterfly, a male, on September 11.


*One final note, the sap of milkweed can cause atopic dermatitis, inflammation, pain swelling, burns and corneal damage to the eyes. Be very careful when working/handling it.


Monday, October 16, 2017

IN MEMORY


Flowers are a special way to remember the life of someone who is no longer with us. At the Schoolhouse Senior Center in Folsom, friends and loved ones purchased plants to memorialize members who have passed away. The garden club members wrapped each plant in gold foil and tied them with a ribbon for presentation at a Memorial Service on September 20. As each name was called, stories, eulogies and special thoughts were shared by attendees. After the memorial service the flowers were planted in the gardens surrounding the Schoolhouse property. The garden club planted a combination of chrysanthemums (mums) and native perennials, placing identification markers next to each plant.

Chrysanthemums are the largest commercially produced flowers in the US with their roots dating back to 1884. Mums are short day plants (long night) requiring less then 12 hours of light to form flowers. The official “Queen” of fall flowers they represent the end of summer and the start to fall. They liven up the garden, bringing joy and beauty when other plants have faded away. Using mums at a funeral or memorial service symbolizes sympathy, honor and respect.

To help achieve the goal of having the gardens certified pollinator friendly, native plants were purchased from Redbud nursery in Media, PA. One shrub (or tree) and fifteen perennials where needed to complete the application process. (For information on getting your garden certified “Pollinator Friendly” go to ento.psu.edu). The plants purchased should help the Schoolhouse meet the requirements for certification!

Senior Community Services Mission is to “provide independent and meaningful living for older adults through direct services and programs in the home and community”. Master Gardeners (of Delaware County, PA) work with garden club volunteers to maintain and enhance the gardens. We meet April through October (weather permitting) on Monday mornings from 9-11 am. If interested in helping out in 2018, please feel free to contact me.


If you would be happy for a lifetime, grow Chrysanthemums.” (a Chinese philosopher)


Tuesday, September 26, 2017

RAGWEED vs GOLDENROD: GUILT BY ASSOCIATION

Fall, cooler temperatures, less bugs, shorter days and "achoo"!. Often referred to as hay fever (with neither hay or fever being a factor), the proper term is allergic rhinitis.  Effecting 40-60 million Americans annually, symptoms include runny or stuffy nose, itchy eyes, scratchy throat, fatigue and of course sneezing.  Unfortunately, what is often blamed for the cause of your misery is a case of mistaken identity.

Like fraternal twins both ragweed and goldenrod are part of the Asteraceae or Compositae family.  This group also includes aster, daisy, marigold, zinnia, dandelion, sunflower and many others. However no on ever says, "geez, those sunflowers are really bothering my allergies!"  So why is there so much confusion?  They are both native, could that be the reason?  Probably not.  It's more likely because they are both blooming around the same time of year.  Beyond that there are really no similarities.  Goldenrod with its bright yellow flowers outshines ragweed's unexceptional pale, greenish flowers.

Belonging to the Genus, Ambosia ("food of the Gods"),  Ragweed is either an annual, perennial or a shrub and spreads by seeds, rhizomes or has a taproot.  It's a food source for quail and other birds and a host plant for some moths and butterfly's.  Native Americans used fibers from the stems to make thread, crushed leaves to place on insect bites, made a salve for skin sores and teas for medical uses.  Ragweed pollen is lite making it easy to move about in the wind.  It begins its assault on our sinus's  in August and continues into November, not stopping until after the first frost.   A single plant can produce about a billion grains of pollen per season, peaking around labor day.  One indicator of climate change is the increase length in the ragweed season.

Goldenrod is ranked as a top herbaceous plant by Doug Tallamy, author of "Bringing Nature Home".  Probably one of the most important late season sources for pollen and nectar Solidago, the Latin word for goldenrod means "to make whole" due to its wound healing properties. Native Americans chewed on the leaves to soothe sore throats and the roots for toothaches. In herbal medicine it is brewed into a tea and used as a  tonic for kidney and urinary track infections.  Goldenrod is heavy and sticky making it difficult to be wind pollinated.  Instead, the pollen hitches a ride on the insects that feed on it's nectar and is carried from one plant to the next.  Roughly 115 species of moths and butterflies and 11 species of native bees, as well as honeybees, solitary wasp and fire flies rely on goldenrod for food.  In the fall goldenrod is a critical food source for monarch butterflies during the "Great Monarch Migration" as they return to their overwintering sites in California and New Mexico.  Left in the garden, goldenrod offers winter interest as well as seeds for birds.


GOLDENROD


Monday, April 24, 2017

HUNG UP ON WINDOW BOXES


It is believed that the first window boxes hung from the terraces in the Gardens of Babylon (southern Iraq) making the plants look like they were suspended or floating in mid air. The story goes that King Nebuchadnezzar II, who ruled between 605-562 BC had the gardens built for his wife Queen Amytis of Medis who was homesick for the mountains of her homeland. In 290 BC the Babylonian Priest Berrossus writes about these gardens crediting the King with their creation. The exact location of these gardens have yet to be identified and no physical evidence have been found making some believe they are more mythical then physical. If the gardens were real then it's believed that they had been destroyed after the 1st century AD.


For the Romans the use of window boxes was purposeful and convenient. These terra cotta boxes were used for growing herbs for food, medicine and religious purposes. Overtime, these boxes took on a more decorative role with flowers replacing herbs. Wealthy Romans created gardens on balconies and rooftops with the use of window boxes. Roman writer, naturalist and philosopher Pliny the Elder mentions window boxes in his works, Naturalis Historia (encyclopedias). In it he writes:

The urban poor used to have window-boxes, which gave them a glimpse of the countryside every day, but now the countless violent burglaries have forced them to shutter their windows.”

The use of window boxes spread through Europe (as did the Romans) and eventually to the US. The French used wrought iron to create their boxes while the English utilized wire hay baskets for a “cottage style garden”. The arrival of the settlers to America gave rise to the traditional colonial style window box. One thought is that the poor utilized window boxes in Europe do to lack of land for traditional gardens. In historic cities like Charleston, South Carolina, homes extend all the way out to the sidewalks. This left no front yard garden space, thus the use of window boxes. Today, these boxes play a vital role in the cities appearance.

 
According to an article in the Independent (Oct. 13, 1995) window boxes were at their height of popularity by the 1870's. In 1955, Neosho Missouri embarked on a city wide, beautification project utilizing window-boxes. Since 1957 it has been known as “The Flower Box City” at least to the locals. In cities like Philadelphia, window box companies will design, install, plant and replant your window-boxes seasonally.


When designing your own window boxes think “Thriller, Filler, Spiller”. Thriller plants are the tallest, adding drama, movement and a focal point. Fillers, as the name implies adds mass, texture and color. And spillers are trailing plants that drape over the sides, creating softness and anchors the design.


Window boxes can add charm and beauty. They are miniature gardens that bring nature in and provide a colorful view looking out. They can also support our pollinators. In 2016 the USDA launched “Plant A Window Box for Pollinators” through the Peoples Garden Initiative Website (peoplesgarden.usda.gov). This tool helps you locate plants for pollinators based on your zip code. The Pollinator Partnership (pollinator.org/windowbox) has created an online web application in which you can create a window boxes for pollinators with an emphasis on native plants. Once created you can share your virtual window box with others through social media or create the real deal.


Thursday, February 23, 2017

IT'S WINTER, HOW DOES YOUR GARDEN GROW?

"Every gardener knows that under the cloak of winter lies a miracle … a seed waiting to sprout, a bulb opening to the light, a bud straining to unfurl.  And the anticipation nurtures our dream.” –  Barbara Winkler


December 21 is the shortest day of the year (in the northern hemisphere) and the official start to winter! Known as the Winter Solstice it is also the start of “WINTER SOWING” (creator and Guru Trudi Davidoff).  This is a nifty method of outdoor seed germination using milk cartoons, 2 liter soda bottles, plastic kitty litter jugs or other similar types of containers. These mini-greenhouses are placed outdoors in a safe and sunny locations, protected from heavy winds but can still get water from rain or snow. Winter Sowing works with perennials, annuals, herbs and even garden veggies.

Winter sowing is not difficult but does have a few guidelines. For starters, the containers need to be “transparent”, deep enough to hold 3"-4” of potting soil along with adequate “head space” There also needs to be drainage holes on the bottom (so we don’t drown our seeds) as well as ventilation holes on the top (or remove the cap). Hardier seeds are started in January and the more tender seeds in February and March.

As the days start to warm but the nights are still cold seedlings will began to emerge. As the seedlings grow keep an eye on moisture levels and water as needed. Open up the containers on nicer days but close them up at night if cold or a chance of frost. Winter-sown seedlings are naturally “harden off” allowing direct transplanting into the garden come the Vernal (Spring) equinox!


http://www.wintersown.org

Monday, January 2, 2017

ENHANCING POLLINATOR HABITATS THROUGH GARDENING AND CERTIFICATION


What's all the buzz about gardens for pollinators? For starters, 85% of all flowering plants rely on pollinators! Without them you would not have many of the fruits and vegetables that you enjoy eating. Examples of common foods dependent upon or benefit from pollinators are apples, blueberries, raspberries, strawberries, cucumbers, pumpkins, almonds, melons, squash, peppers, tomatoes, spices, cocoa, coffee and figs just to name a few! As the saying goes, “1 in 3 bites” of our food relies on pollinators. So the next time you are at the supermarket look around at the produce section. Now look again but imagine 33% of the shelves are bare. Without pollinators, that could be a reality.


If your vegetable garden is not doing well or your fruit trees are failing to produce, chances are that you are not attracting enough pollinators into your yard. Our pollinators travel about without regard to property lines or fences. Creating a pollinator friendly garden is simple no matter how big or small. By planting a garden focused on welcoming these insects, you can increase the number of pollinators in your area. Select plants that provide adequate food sources for bees, butterflies, moths, beetles, hummingbirds and other pollinators. You will need both pollen and nectar producing plants with bright colors and a variety of shapes and sizes to attract many different pollinators. Stick with plants specific or native to your area (avoiding non-native and exotics) which better support pollinators. Have a combination of spring, summer and fall blooming flowers and whenever possible, plant in groups of 3 or more to better “grab” the pollinators attention. When planting annuals go with old fashion heirlooms (avoiding hybrids) and intersperse them among the vegetable plants in your garden. You can also designate a section of your yard strictly for a pollination garden and reduce grassy areas by planting more pollinator friendly trees, shrubs and plants. No matter if you are planting in flower pots, window boxes or garden beds you can make a positive impact one plant at a time. One yard is great, but a string of yards is even better!


In 2007 the U.S. Senate unanimously designated one week each June as National Pollinator Week. Several years later( 2011) Penn State Master Gardeners began certifying Pollinator Friendly Gardens. Pollinators need our help. Their numbers are in decline due to habitat loss, disease and contact with pesticides. Penn State Extension Master Gardeners are taking action to protect pollinators by planting pollinator friendly gardens and providing education for the gardening public. Won't you make an effort by gardening with a purpose, selecting plants that provide food, shelter and nesting sites and limiting the use of pesticide? Pollinators will, in turn, provide the pollination needed to protect our plant diversity and food sources. Certifying your property as “Pollinator Friendly” will help support a healthy ecosystem for our community and the future. Plus, you'll have the satisfaction of knowing you are making a difference!